

Many people prefer to hang their clothes lines using galvanised steel washing line posts.
If you have the space this is ideal and you can dry more washing than on a rotary line. Galvanised steel is ideal for poles as it's strong and won't rust in the rain.
In this article, we'll discuss how you can put up your own line quickly and easily. You'll find a couple of methods for doing this, a variety of different steel posts and the other supplies you may need.
Steel Washing Line Posts & Accessories
2 Methods For Using Posts
If you are going to use steel posts to hang a washing line, there are 2 common ways you can do this:
1. Use Two Washing Line Poles
The first method is to use two poles and fix a line between them.
This might be suitable if you have the space and want a longer line.
However, it does involve a bit more time, money and effort as you'll have to buy two posts, more cement and dig two holes.
If you're thinking about this method, WatsonLok sell a pack of 2 galvanised iron posts.
These are 2.4m tall, but when you've cemented them into the ground, you're washing line will be about six feet in the air.
To keep the line taught with this design, you can use an inexpensive clothes line prop (as pictured above).
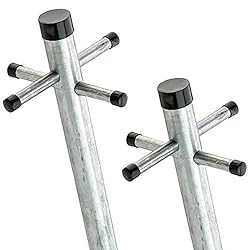
iAn advantage of this particular set is it comes with sockets for the poles.
This makes them a 2-piece pole, and you first cement in the socket and then slot the pole in.
The obvious advantage is that you can remove both posts if you're having a BBQ in the garden, or are just worried about the kids running into them.
The only drawback is that nothing is included to put into the socket when the pole is removed. So if it rains, they will fill up with water and it makes getting everything back together again a bit messy!
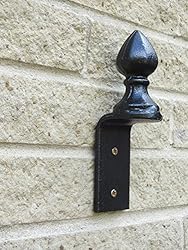
2. Use One Post & A Wall
Another popular method is to use just one post and the side of your house.
This has quite a few advantages as you only need one pole and one hole. You do need a masonry drill, though
You can use a rather ornate fixing bracket as pictured on the right (and there is a matching post) or you can go with something like a cheap closed hook anchor which will secure into your wall.
You can also use a retractable washing line, and some of these come with their own brackets, too.
Securing Your Post In The Ground
Whether you're going with one post or two, you're going to need it placed securely in the ground.
You don't need a cement mixer, as there are a lot of products such as Postfix where you just add water.
One bag is good for one post so you don't even need to measure it out.
Here are some important things to remember.
Calculating The Size Of The Hole
Usually, the manufacturer (or reviews) will tell you the recommended size of the hole.
Clothes lines are pretty uniform in height, so most people dig the hole to be 2-foot deep and 20cm by 20cm in diameter (roughly!).
I like the above formula because is you're using the WatsonLok poles they are 2.4m high and 50mm in diameter.
This means your hole should be 600mm deep (24") and 150mm (6") by 150mm in diameter.
Fixing The Washing Line Post In Place
It's better to use two people to set the washing line post in place. One to keep it straight and the other to pour in the concrete mix.
It goes without saying that using a spirit level is vital to checking it is straight.
Don't forget to check both the vertical line as it stands and horizontal next to the ground.
Once it's nice and straight, pour the powder into the hole and add some water.
It should set in a few minutes, so this doesn't allow you much time to adjust the post (which is why an extra pair of hands is great).
Once everything is set, allow around 24 hours before placing any strain or weight on it.
Although this is a video for an American product, it does have some great info for digging the hole and getting a clothes line post into place.
Knots For Tying Your Line
How you fix your line will depend on the style of your washing line post and line that you choose.
If you go with a retractable washing line, they usually come with hooks to attach to posts.
If your going with a bog standard washing line, it would be helpful to know a couple of useful knots.
Now, there are quite a few knots that you can use, but it's important to have one that's fixed and one that can be pulled taught.
Here is a great video explaining this concept and using a clove knot and a truckers knot to make a washing line.
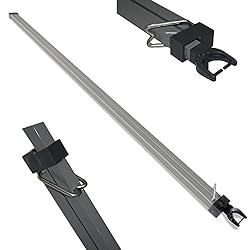
Using A Prop To Keep The Line Taut
Keeping a washing line taut can be a big problem.
If the line sags under the weight, all the washing can bunch together in the middle and longer items such as dresses touch the ground. Not good!
With fixed metal posts, there is no way to adjust their height up or down to tighten the line. So what can be done?
Well, perhaps the easiest method is to use a clothes line prop. This is usually placed under the line to stop it sagging in the middle.
Another easy method is to use some cheap cleat hooks. This allows you to wrap the line around in a figure-8 to make it taut.
If you check out this video, you'll see how they use two metal posts, cleat hooks and pulleys to make a really tight and secure post to wall clothes line.
Can you add any tips for fixing washing line posts that we've missed? Please let us know in the comments section!